
Priya Nandakumar, Staff Writer.
You are standing at the bathroom mirror under a bulb that flatters no one, holding a bottle you bought because a fifteen-second video promised it would erase everything: the redness along your nose, the shadows under your eyes, the breakout that showed up the night before a wedding. Two hours later it has settled into every line on your face and gone a shade too orange. Somewhere in your drawer there are four other bottles in the same situation, half used, each one a small failed experiment.
Full-coverage foundation is not actually complicated once you understand what it is doing to your skin and why most of the frustration comes from three fixable habits, not from a bad product. One useful fact to start: foundation shade is decided by undertone, not by how tan or pale you are, which is why the same “medium” bottle can look perfect on one person and gray on another standing right next to her.
This guide walks through the parts that actually matter: how to read your own undertone honestly, what coverage numbers on a label really mean, how to prep skin so foundation stops cracking by 3 p.m., and how to tell marketing language from a real difference in the jar.
- Undertone, not depth, drives a match. Two bottles labeled the same shade can look wrong on the same face if their undertones differ; test on the jaw in daylight, never under store fluorescents.
- Full coverage lives in pigment load and film formers, not in the word on the label. A thin layer of a well-built formula can out-cover a thick layer of a cheap one.
- Skin prep decides whether foundation lasts or cracks. Most midday breakdown traces back to a dry patch or an unset oil slick, not to the foundation itself.
Finding Your Undertone In Daylight

Most shade-matching mistakes happen because the light lied. Store fluorescents skew everything cool and slightly green, phone camera flashes skew warm, and the little mirror at a drugstore counter is doing you no favors either way.
The fix is almost embarrassingly simple: check the back of your hand or your jawline near a window, in daylight, with no makeup on the test area. Warm undertones lean gold or peach and often show green veins at the wrist. Cool undertones lean pink or red and show blue-purple veins. Olive and neutral undertones sit in between and can go either way depending on the season, since skin genuinely shifts a touch warmer in summer and paler in winter under indoor heating.
A practical self-test: hold a plain sheet of white paper next to your bare face in daylight. If your skin looks rosy or bluish against the white, you are likely cool. If it looks golden or slightly yellow, you are likely warm. If you cannot decide, you are probably neutral, which is actually the easiest undertone to shop for since most neutral shades forgive small mismatches.
Once you know the undertone, depth (fair, light, medium, tan, deep) becomes the easy part, because you are only choosing along one axis instead of guessing at two. Buy the smallest size available, or ask for samples, before committing to a full bottle, since even a correct undertone can oxidize a half-shade darker within twenty minutes on some skin chemistries.
What “Full Coverage” Actually Means Under The Skin
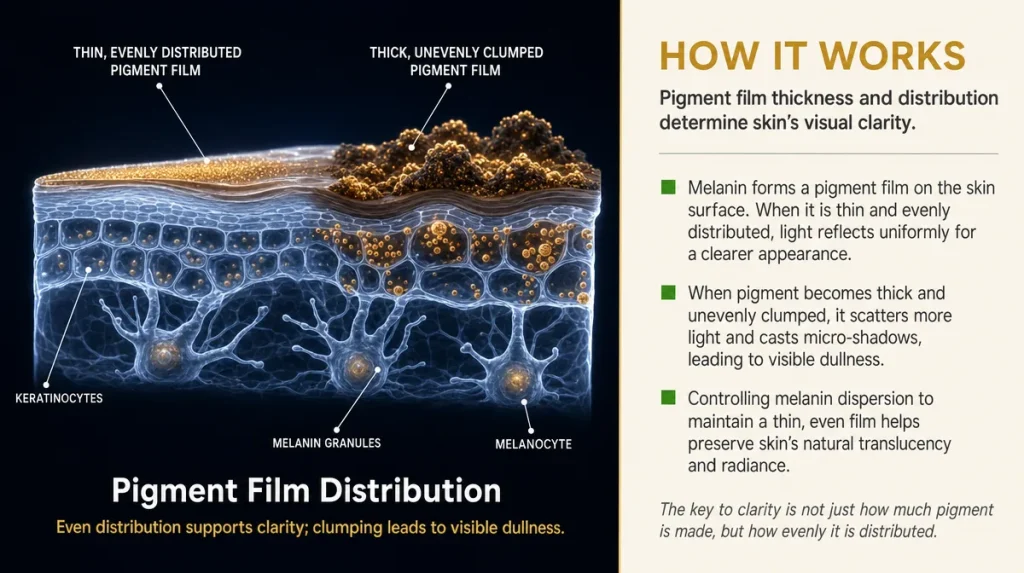
Think of foundation like paint on a wall with old marker stains showing through. A thin coat of cheap paint lets the marker bleed through no matter how many times you go over it. A well-made primer-and-paint combination blocks it in one or two coats because the pigment particles are packed tighter and bound with something that holds them in a flat, even film.
Foundation works the same way. Coverage comes from two things: how much pigment is suspended in the formula (the pigment load) and how well the film formers hold that pigment flat and even on the skin rather than letting it sink into pores and fine lines. A formula with a high pigment load but weak film formers will look full coverage in the bottle and patchy by lunchtime. A formula with a lower pigment load but excellent film formers can look more even, longer, with less product.
This is why “full coverage” printed on a label is a starting claim, not a guarantee. A 2022 study in the International Journal of Cosmetic Science testing pigment dispersion in emulsion-based foundations found that particle distribution, not total pigment percentage, was the stronger predictor of perceived coverage after several hours of wear. In plain terms: how the pigment is spread matters more than how much of it there is.
Prepping Skin So It Does Not Crack By 3 P.m.
The single biggest cause of midday foundation breakdown is not the foundation. It is a dry patch fighting with an oily zone on the same face.
Dry skin pulls moisture out of foundation as it sits, which is what causes that flaky, settled-into-fine-lines look around the nose and mouth by early afternoon. Oily skin does the opposite: it pushes oil up through the foundation, breaking the flat film and letting shine punch through by midday, especially through humid East Coast summers when the air itself is holding extra moisture against the skin.
The fix starts before the foundation ever touches your face. A lightweight moisturizer suited to your skin’s actual needs, given a few minutes to absorb, gives foundation an even surface to grip rather than a patchwork of dry flakes and oily shine. In dry winter months with indoor heating running, that step matters even more, since indoor air can be drier than outdoor air.
A short self-test: press a clean tissue lightly against your bare cheek and forehead before applying anything. If it comes away with visible oil, you likely need a mattifying step in your prep. If your skin feels tight rather than leaving a mark, you likely need a richer moisturizer step. Skipping this diagnosis and blaming the foundation is the most common, and most avoidable, mistake beginners make.
The Shade-matching Mistakes Almost Everyone Makes
Three mistakes account for most bad matches, and none of them require a new bottle to fix.
The first is matching on the back of the hand instead of the jaw or neck. Hands are exposed to sun and washing differently than the face and often run a shade or two off. The jawline, blended down toward the neck, is the honest test area.
The second is matching indoors under warm bulbs at home, then wearing the foundation outdoors in daylight, where it suddenly reads orange or ashy. If you only ever check your match under one kind of light, check it under a second kind before you commit.
The third is buying a shade for winter skin and expecting it to hold through summer, or the reverse. Skin genuinely shifts with the seasons, sun exposure, and even with product routines that include exfoliating acids, so a shade that matched perfectly in January can look chalky by July. Many people keep two shades on hand, one slightly deeper for the months when they are outside more.
A quick way to catch a mismatch before leaving the house: apply a stripe of foundation from cheekbone down to the jaw and blend the edges. If the stripe disappears completely into the neck and chest, it is close. If you can see a line no matter how much you blend, the shade itself is off, not your blending technique.
Brush, Sponge, Or Fingers: How The Tool Changes The Result
The tool you use to apply foundation is not a style choice, it changes how much product ends up on your skin and how the finish looks.
A dense, flat foundation brush pushes product into the skin and tends to build the most visible coverage fastest, which is useful for spot-correcting redness or covering a breakout but can look heavy if used all over without thinning the product first. A damp sponge, by contrast, absorbs some product into its own material and bounces the rest onto the skin in a thinner, more diffused layer, which is why sponge application often reads more like skin and less like makeup. Fingers warm the product and can melt it into skin efficiently, but they deposit unevenly unless you work in small sections and blend outward each time.
A simple household comparison: a paint roller (brush) lays down more material per pass than a sea sponge (makeup sponge), which absorbs and redistributes. Neither is wrong, they just move different amounts of product for different jobs.
Most people benefit from combining tools rather than picking one for life: brush or fingers to build coverage where it is genuinely needed, then a damp sponge to press and blend the edges so nothing sits as a visible layer on top of the skin. Testing this on one side of your face at a time, then comparing in daylight, is the fastest way to see which combination actually suits your skin rather than the technique a tutorial happened to use.
Setting Foundation Without It Looking Cakey
Cakey is not really about how much foundation you applied. It is about what happens to the layer on top afterward.
Setting powder or spray is meant to lock the foundation film in place so it does not slide into pores or fine lines over the following hours. Applied with a heavy hand, especially over areas that are already dry, that same powder sits on top of the film instead of blending into it, and that visible extra layer is what reads as cakey in photos even when it felt fine in the mirror.
The practical fix is to set only where oil actually breaks through, usually the center of the forehead, the sides of the nose, and the chin, rather than dusting the entire face out of habit. A light hand with a fluffy brush, tapping rather than swirling, presses powder into the film instead of piling it on top.
A useful check before leaving the house: look at your face from an angle, under a stronger light than your bathroom mirror gives you, ideally near a window. If you can see a visible texture change where the powder was applied, that area likely has too much product. Blotting gently with a tissue, rather than adding more powder, is usually the better second step.
How To Judge Whether It Is Actually Working, And When To Give Up On A Bottle
Give a foundation a fair trial before deciding it has failed you. A single bad day, especially one with unusual heat, humidity, or a skincare product you had not used before underneath, is not enough evidence.
A reasonable test is three separate wears, on different days with your normal routine, checking the foundation at the two-hour mark and again at the six-hour mark. Look specifically at the same trouble spots each time: does it crease in the same fine lines, does it oxidize toward orange by the same point in the day, does oil break through in the same zones. A pattern across three wears tells you something real. One rough day tells you very little.
If the pattern holds and the foundation genuinely is not working for your skin, the more useful question is not “which foundation should I buy next” but “which part failed.” If it faded evenly and just looked sheer by afternoon, the pigment load may be too light for your goals. If it cracked into lines, the issue is likely dryness underneath, not the product itself. If it slid off in the T-zone, the issue is oil control, not coverage.
Diagnosing which part failed before buying the next bottle is what actually breaks the cycle of a drawer full of half-used foundations, since it points you toward the real fix, whether that is a different formula, a different prep step, or a different setting method, rather than another guess.
What Is Marketing Language And What Is A Real Difference
Labels are crowded with words that sound like promises but describe very little. “Long-wearing” has no fixed industry definition, and “buildable” simply means you can apply more than one layer, which is true of almost any liquid foundation.
A few label terms are worth paying attention to because they describe something mechanical rather than a feeling. “Oil-free” or “oil-control” formulas typically use different film formers suited to oilier skin and can genuinely behave differently on a T-zone. “Dermatologist-tested” and similar phrasing describes that testing occurred, not what the results were, so it is worth treating as a neutral fact rather than a guarantee.
The American Academy of Dermatology publishes general public guidance on choosing noncomedogenic products for acne-prone skin, and that kind of plain-language guidance is a more reliable filter than most bottle claims, since it focuses on ingredient behavior rather than marketing category.
The most useful habit a beginner can build is patch-testing new products on a small area for a few days before trusting them on the whole face, and treating any claim you cannot verify on your own skin as marketing until proven otherwise. Coverage, wear time, and finish are all things your own face will tell you within a week, far more reliably than a label will.
Key Takeaways
Undertone decides a good match more than depth does, and daylight is the only honest test light. Coverage comes from pigment load and film formers working together, not from the word printed on the bottle. Most midday breakdown starts with skin prep, not the foundation itself. Different application tools genuinely change how much product ends up on your skin, so it is worth testing combinations rather than settling on the first tutorial you watched. Give any foundation three fair wears before judging it, and diagnose which part failed before buying the next one.
A Quick Checklist Before You Buy
- Check undertone on the jaw, in daylight, not under store lighting
- Confirm the match a second time under a different light source before committing
- Moisturize and let it absorb fully before foundation goes on
- Match your application tool to the finish you want, not to habit alone
- Set only where oil actually breaks through, not the whole face by default
- Wear a new foundation three separate days before deciding it has failed
- Patch-test new formulas for a few days before trusting them fully
This article is general information and does not replace individual advice from a dermatologist or skincare professional.
Results and skin reactions vary from person to person.